

How To Build A Gopher Proof Garden Bed
Updated date:
How to Build Natural Raised Garden Beds Using Free Materials
I have been building raised garden beds for over five years, mainly to grow vegetables. I recently branched out to building ornamental beds.
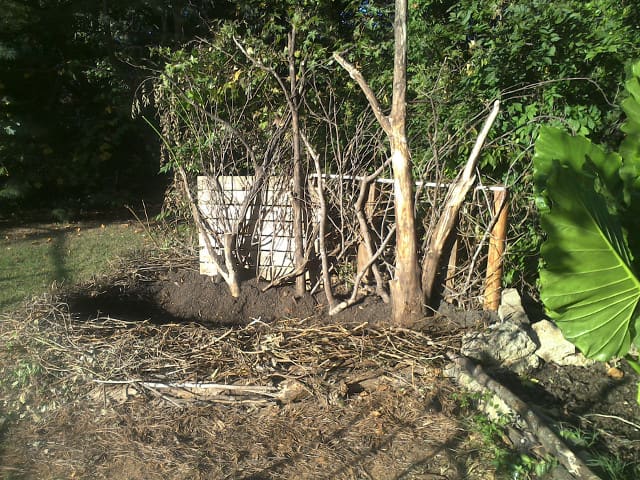
Photo of raised garden bed by Robert Kernodle.
Raised Garden Bed Basics
Raised garden beds do the following:
- Allow you to engineer your own high-quality soil.
- Partition growing areas clearly while protecting plants from getting walked on.
- Help prevent soil compaction.
- Increase drainage efficiency.
- Warm more quickly and retain warmth longer than ground-level plots.
Choice of materials is as wide as your imagination and resources. No matter what you might choose, however, be aware of toxic materials such as treated wood, roofing shingles, roofing paper, lead-painted boards, railroad ties, asphalt, and other items that might produce long-term diffusion of unwanted chemicals into plants— especially into edible plants like fruits or vegetables.
You still have a wide choice of materials, including cinder blocks, used concrete, wood boards, steel roofing, rocks, bricks, PVC, and more.
The Issue of Permanence
Many people think in terms of permanent structures when they think of raised garden beds, but I believe that this is one of several possible frames of mind. Is anything really permanent? Does nature "think" this way? Look at the changing seasons to find an answer. What do you see? Decay, growth, death, and rebirth. Nature operates in cycles of semi-permanence, and this is something that we can mimic in our built garden structures.
Reduce, Reuse, Recycle
What does it matter, if a raised bed decays in, say, four years? Recycle the decay into the new version of the garden. Enjoy it while it lasts, and maybe improve on it this time around. Decay enriches the soil—it is a natural process that helps to sustain soil ecosystems.
Think about trees in various stages of decay—they are fascinating. I have used decaying trees for building a couple of my own garden beds. I have also used sticks, vines, bush cuttings, pine needles, and even chunks of center wood from a huge fallen tree as decorations. I happen to live near a small patch of woods, where natural materials are readily available. I am also attuned to neighborhood tree-cutting jobs. Tree logs for one of my raised garden beds came from a job that the local power company contracted to keep its lines unobstructed.
This sort of building allows you to take advantage of unforeseen opportunities. In the above case, a power-company tree-cutting project presented me with such an opportunity. I did not plan to build what I eventually built. I just reacted, when the materials showed up. I sculpted on the fly, without a preconceived design. This sort of building, then, is like dumpster diving or junk art, where thrown-away things become useful things.
A Garden Bed Made of Cut Tree Logs
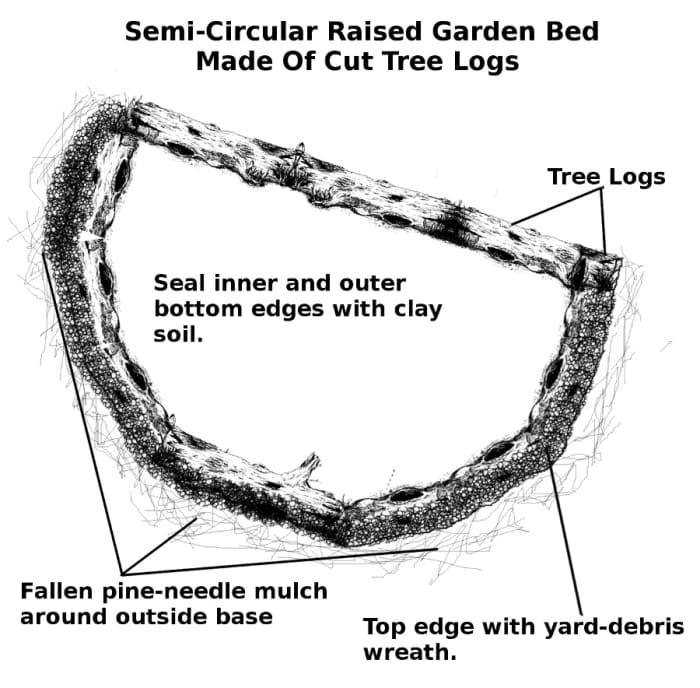
Rough drawing of tree-log raised garden bed by Robert Kernodle
Read More From Dengarden
Log raised garden bed made and photographed by Robert Kernodle
How to Make a Log Raised Garden Bed
Whether you cut the logs yourself or recycle logs cut by other people, just transport them to where you want to locate a raised garden, using a wheelbarrow (I suggest), and then get to work. It might take several trips from source to destination to accumulate the number of logs you need, which is good exercise. Logs can be very heavy too—a natural form of weight lifting. You might need some help.
Be careful not to drop them on your toes or mash your fingers, as you handle them. And be prepared to get a little dirty. If you are not game for some physical exertion and some dirt, then this probably is not a project for you. Also, be prepared to develop your raised garden in stages—it might require multiple sessions over several days.
Step-by-Step Instructions
- Choose a location suitable for the type of plants you want to grow, or simply choose the type of plants that will grow anywhere you want to locate the garden.
- Wait until the ground is dry, before you begin the project.
- First, clear the chosen area of existing growth, using hedge clippers, shovels, hand tillers, a saw, or whatever other tools you need to get rough growth out of the way.
- Next, get down deeper into the ground, removing roots, grass, weeds, big rocks, and other unwanted debris.
- Break up the soil to a depth of six inches or more, putting aside clay clods (if you have these) onto a tarp—you can break them up later by stomping on them to use as part of the fill dirt.
- Once you get the ground clear, tilled, and broken up into loose soil, stomp the clods you set aside earlier, and add these back to the ground you are working.
- At this stage, I add compost to the native ground and turn it in well with a shovel, in order to start the foundation for fertile garden soil.
- After amending this way, level or grade your area of loose soil, so that the logs you transport here for the garden-bed walls will lie more evenly than they otherwise would. Preparing the area this way also helps make a soft foundation that the logs will sink into for greater stability and a better seal.
- Lay out your logs onto the prepared ground in whatever shape you want. I like semi-circles—you can eyeball these as you go, or you can draw out a guideline in the dirt with a stick. You have to nudge, kick, readjust, and fiddle with the logs until they sit right to suit you—just keep at it, until you like what you see.
- Now, make your soil. I suggest doing this in a different location. I use composted cow manure bought from Lowe's, plus cheap fill dirt from the same store, combined with my own homemade compost and/or forest-floor, leaf-mold/sticks/dirt mixture that I harvest responsibly from the patch of woods near me.
- Once you finish making your enriched dirt, transport it to the garden bed (again, wheelbarrow recommended) shovel or dump it in, until full.
- Level the dirt with a rake and your hands (in gloves, preferably).
- Wet it down, and allow it to cure for a few days, or if doing this in the fall, allow it to sit over winter until spring planting time.
Additional Steps
- In addition to the above steps, I use unmodified, clay soil to pack around the inside and outside edges of my logs, before filling. When rain hits this, over time, it becomes like natural concrete, adding further stability to the logs.
- I also like to add a finished rim to the top of the semi-circle, which I make out of hedge clippings, wisteria vines, rose-bush clippings, flexible sticks, and other debris that I lay out on a tarp in a straight line, tie together with rough twine, and then fit around the top of the semi-circle, like a wreath or bird nest.
- Finally, to discourage unwanted grass from growing around the immediate bottom edge, I add a thick layer of fallen pine needles, readily available under several pine trees growing nearby. I just rake it up, transport, and put in place.
- You can add other finishing touches too (for decoration), like twisted sticks, bark-stripped branches, rocks, chunks of broken wood, a backboard of fallen limbs, a combination of found junk and sticks, or whatever else interests you.
- If you want to skip the work of mixing your own garden dirt, and you are willing to bear the greater expense, then you can buy premade garden dirt to use as your filling dirt.
The possibilities are many. What I have written here is just a description of how I do it.
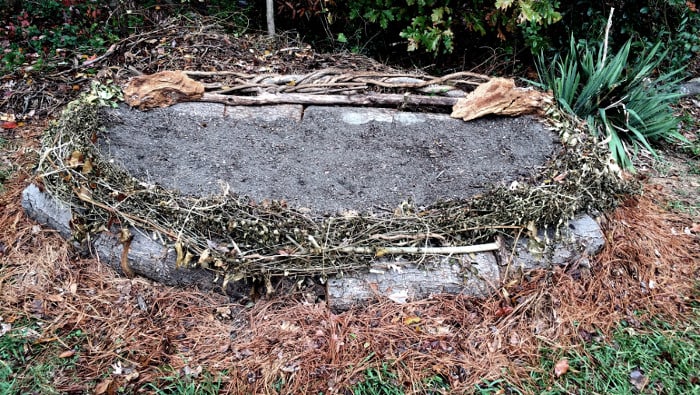
Garden Bed of Natural and Found Materials
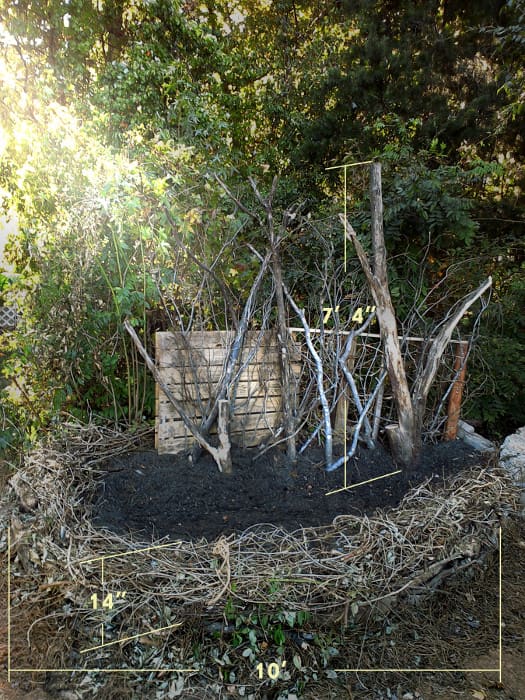
Photo of garden bed made of free natural materials by Robert Kernodle
This content is accurate and true to the best of the author's knowledge and is not meant to substitute for formal and individualized advice from a qualified professional.
Related Articles
How To Build A Gopher Proof Garden Bed
Source: https://dengarden.com/gardening/Build-Raised-Garden-Beds-Using-Free-Materials-From-Nature
Posted by: taylorsockle.blogspot.com
0 Response to "How To Build A Gopher Proof Garden Bed"
Post a Comment